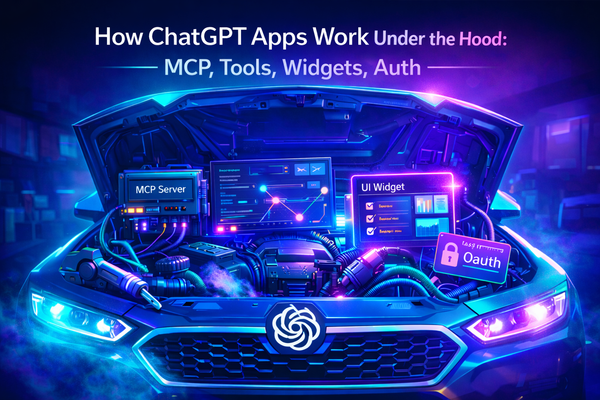
How to Publish an App to ChatGPT

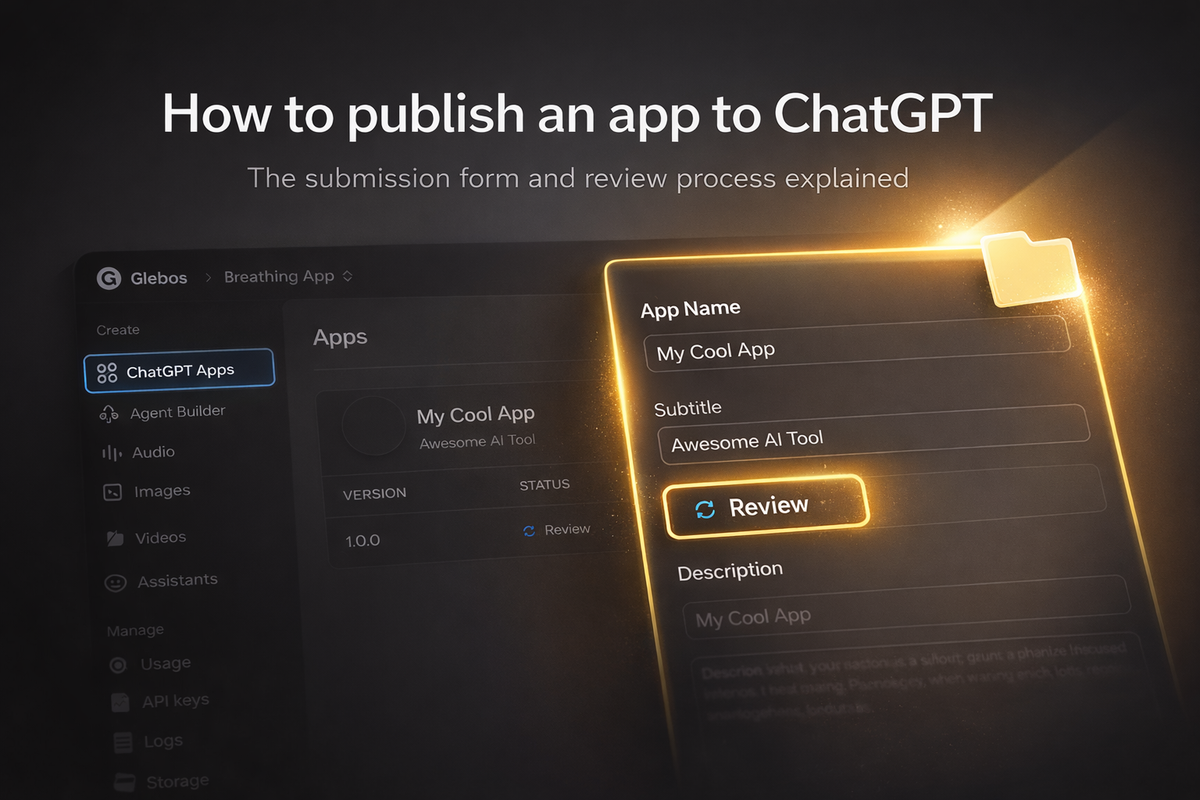
If you want to publish your app in the ChatGPT Apps directory, this guide will walk you through the current submission flow and the form you need to fill out.
Important: right now the rollout appears limited. Most developers can submit an app, and it goes into Review, where it stays while OpenAI evaluates it. In practice, it currently looks like full publishing is available mainly to larger companies, while wider access is expected later.
We still recommend submitting your app for review now. See Top 10 picks from the first wave. Even if approvals are limited today, getting in the queue early can help you move faster once access expands, and being among the first apps in a category is often the easiest way to earn initial visibility and capture your share of the market.
There is also community speculation that open publishing for everyone could arrive around 2026. We’ll update this article as soon as our first in-house app moves past Review. It is currently in Review, and getting past this step will be a strong signal that publishing is opening up beyond large teams.
Preparation
Create a Platform account (this is not done inside ChatGPT)
App submission doesn’t happen in the consumer ChatGPT interface. You’ll do it in the OpenAI Platform dashboard.
- Create an account at platform.openai.com
Choose who you’re publishing as: Individual or Organization
Near the end of the submission flow, you’ll be asked whether you’re submitting as an individual or an organization.
Despite the popular claim that “only organizations can publish,” the current submission flow allows you to proceed as either an individual developer or an organization. Requirements may differ, but both options exist in the UI.
Verification
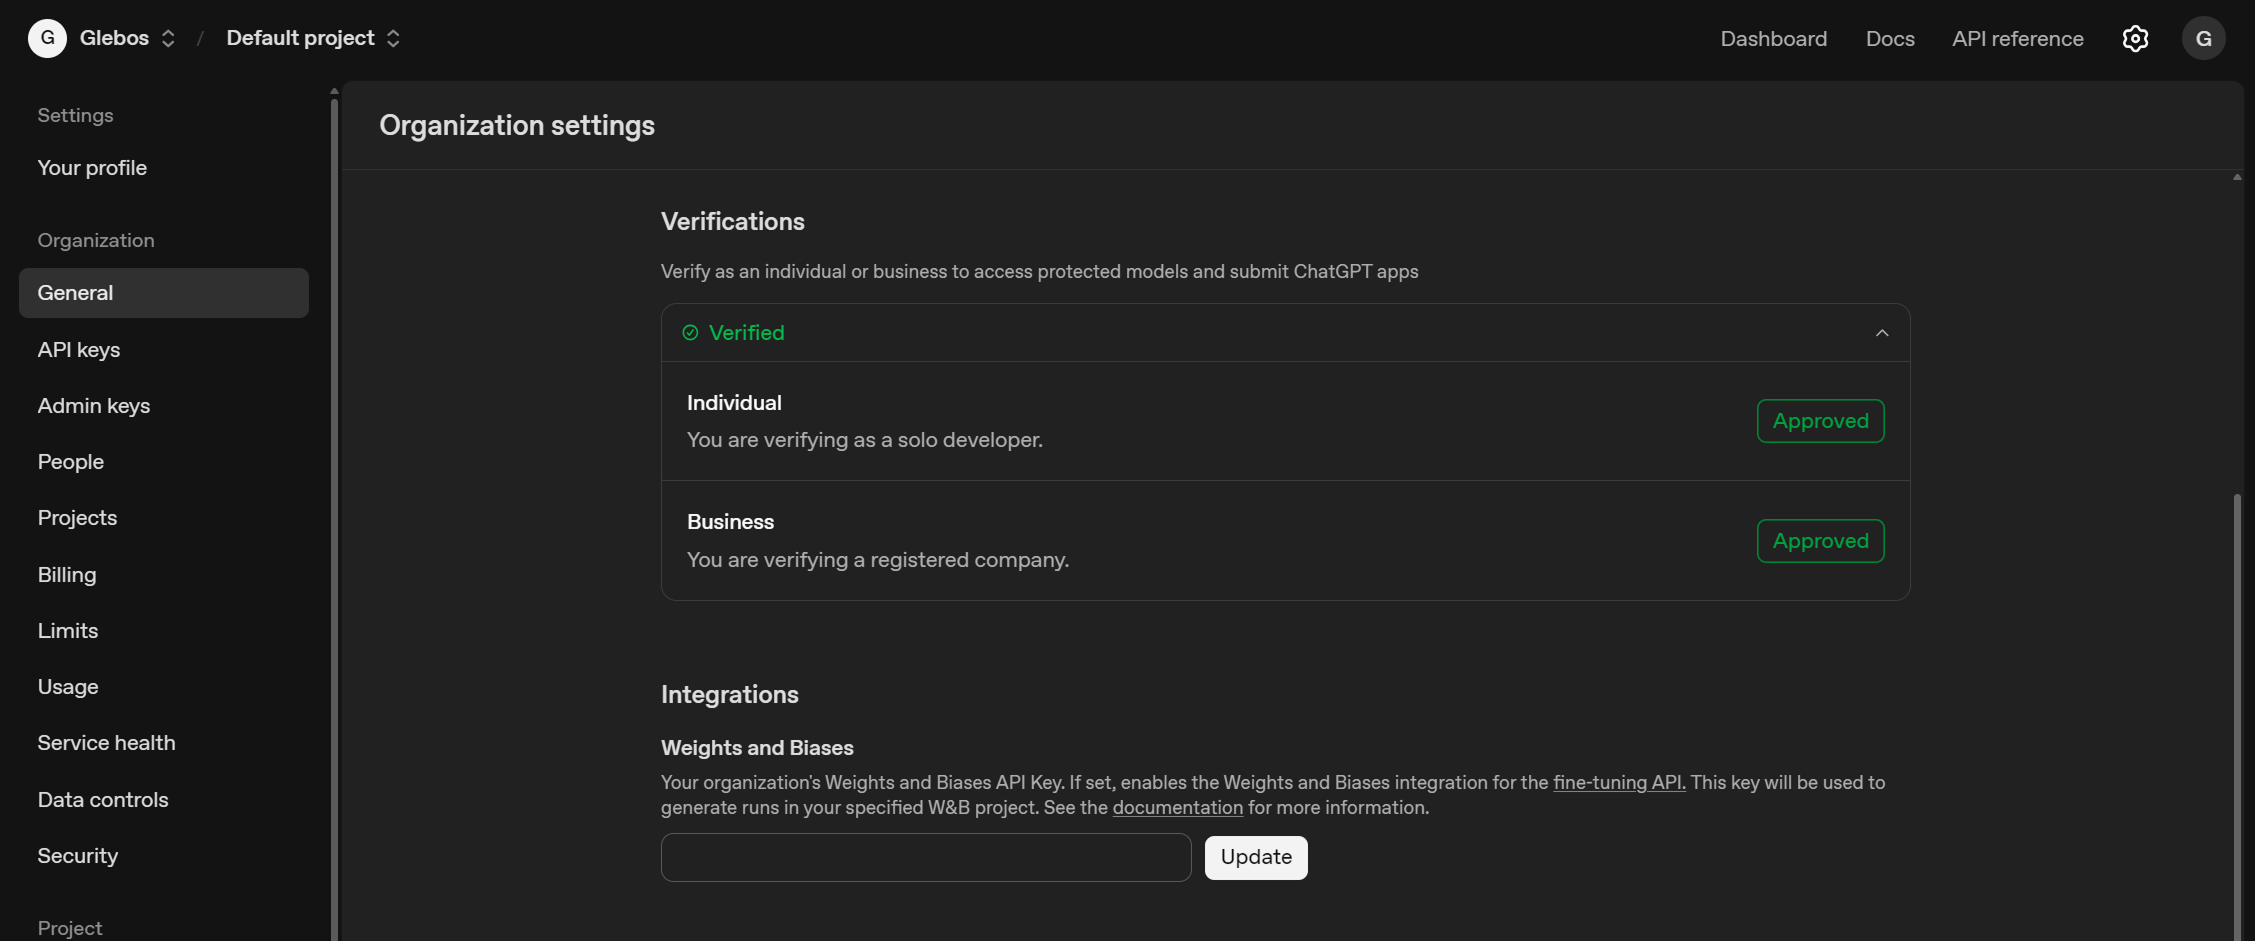
To verify your developer identity (individual or organization), go to:
https://platform.openai.com/settings/organization/general
Choose the appropriate verification option and complete a simple KYC check. Typically, this includes:
- Uploading a government ID or a residence permit
- Completing a quick camera check (selfie / liveness)
Doing this on your phone is usually easier. The camera step tends to be smoother and faster than on a laptop.
App link
To submit your app, you will need a public URL in the format:
your-domain.com/mcp
We’ll cover how to build the app and configure MCP in a separate guide.
For review, you should already have a working MVP at that URL. The reviewers need to be able to open it and see it working.
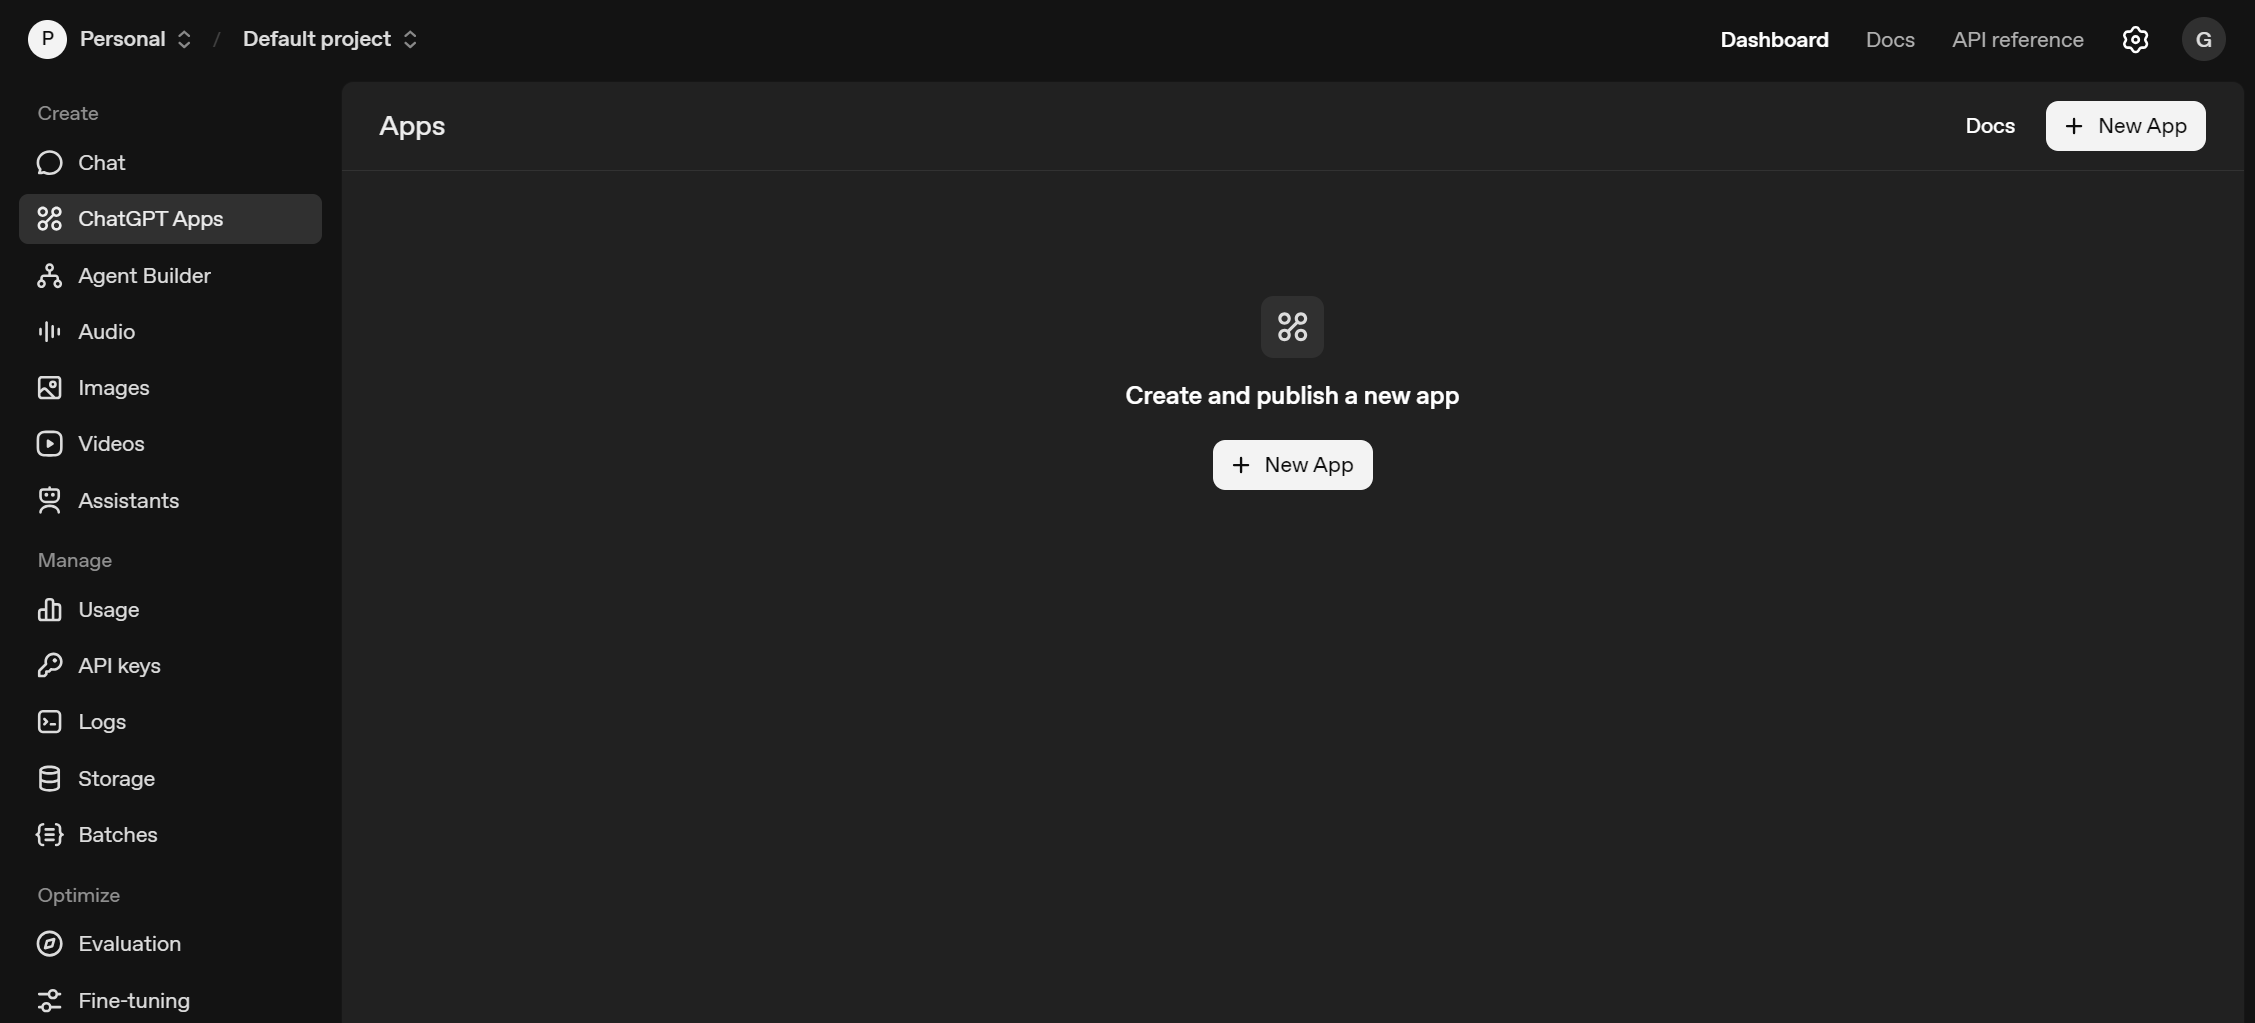
Start filling out the submission form
- Open the OpenAI Platform Dashboard:
https://platform.openai.com/dashboard - If you land on /docs instead, use the top navigation and click Start building to get into the dashboard (this button opens the Platform app).
- In the dashboard sidebar, choose ChatGPT Apps.
- Click + New App to create a new submission.
Step 1: App Info
On this screen everything is straightforward:
Icons
Upload an icon for Light and Dark mode. If your icon has enough contrast, you can use the same one for both.
For a first app, there is no need to spend time on custom design. You can pick a clean, simple icon from libraries like the Noun Project: https://thenounproject.com/
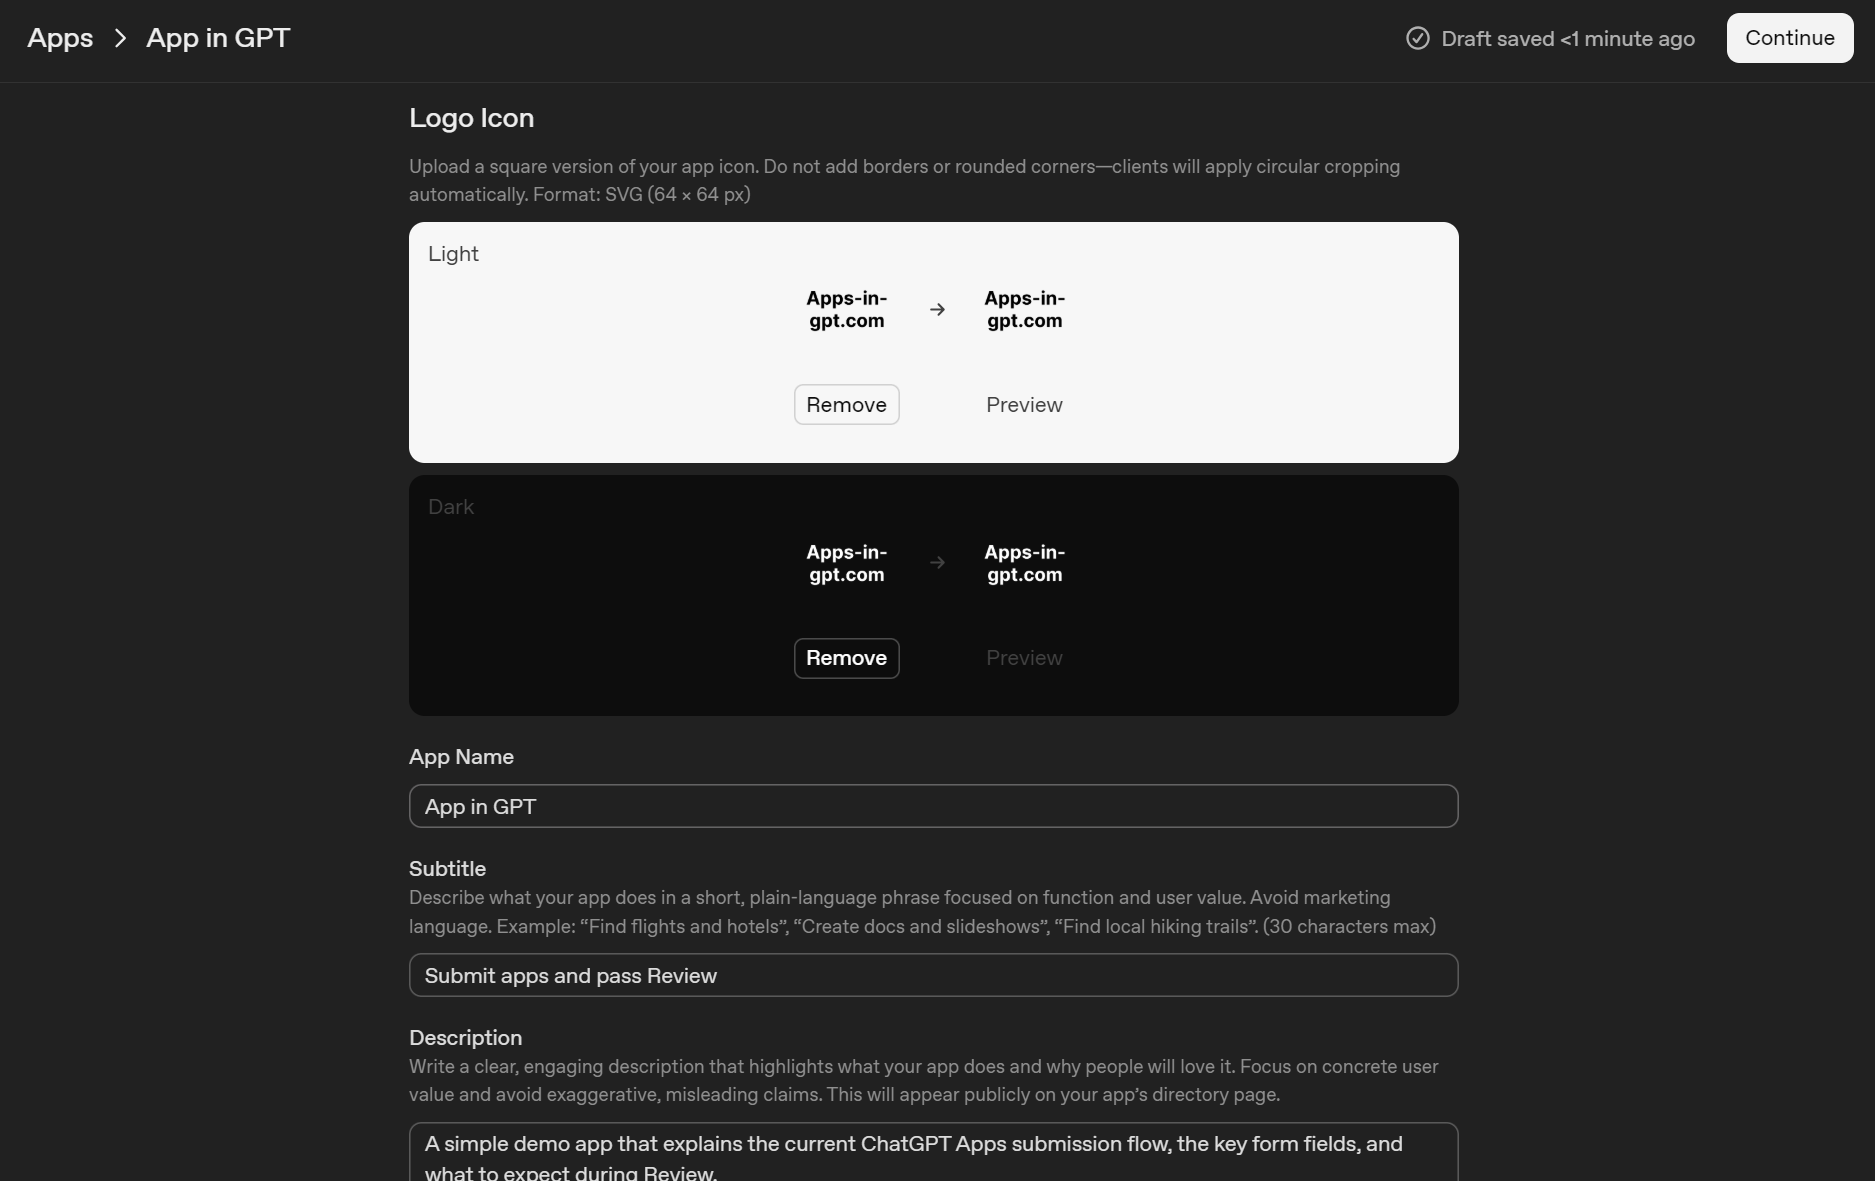
App name, subtitle, description
Next, fill in:
- App Name
- Subtitle (short, plain language, focused on user value)
- Description (this one does not seem strictly size limited, but it is best to keep it similar in length and tone to apps already listed in the directory)
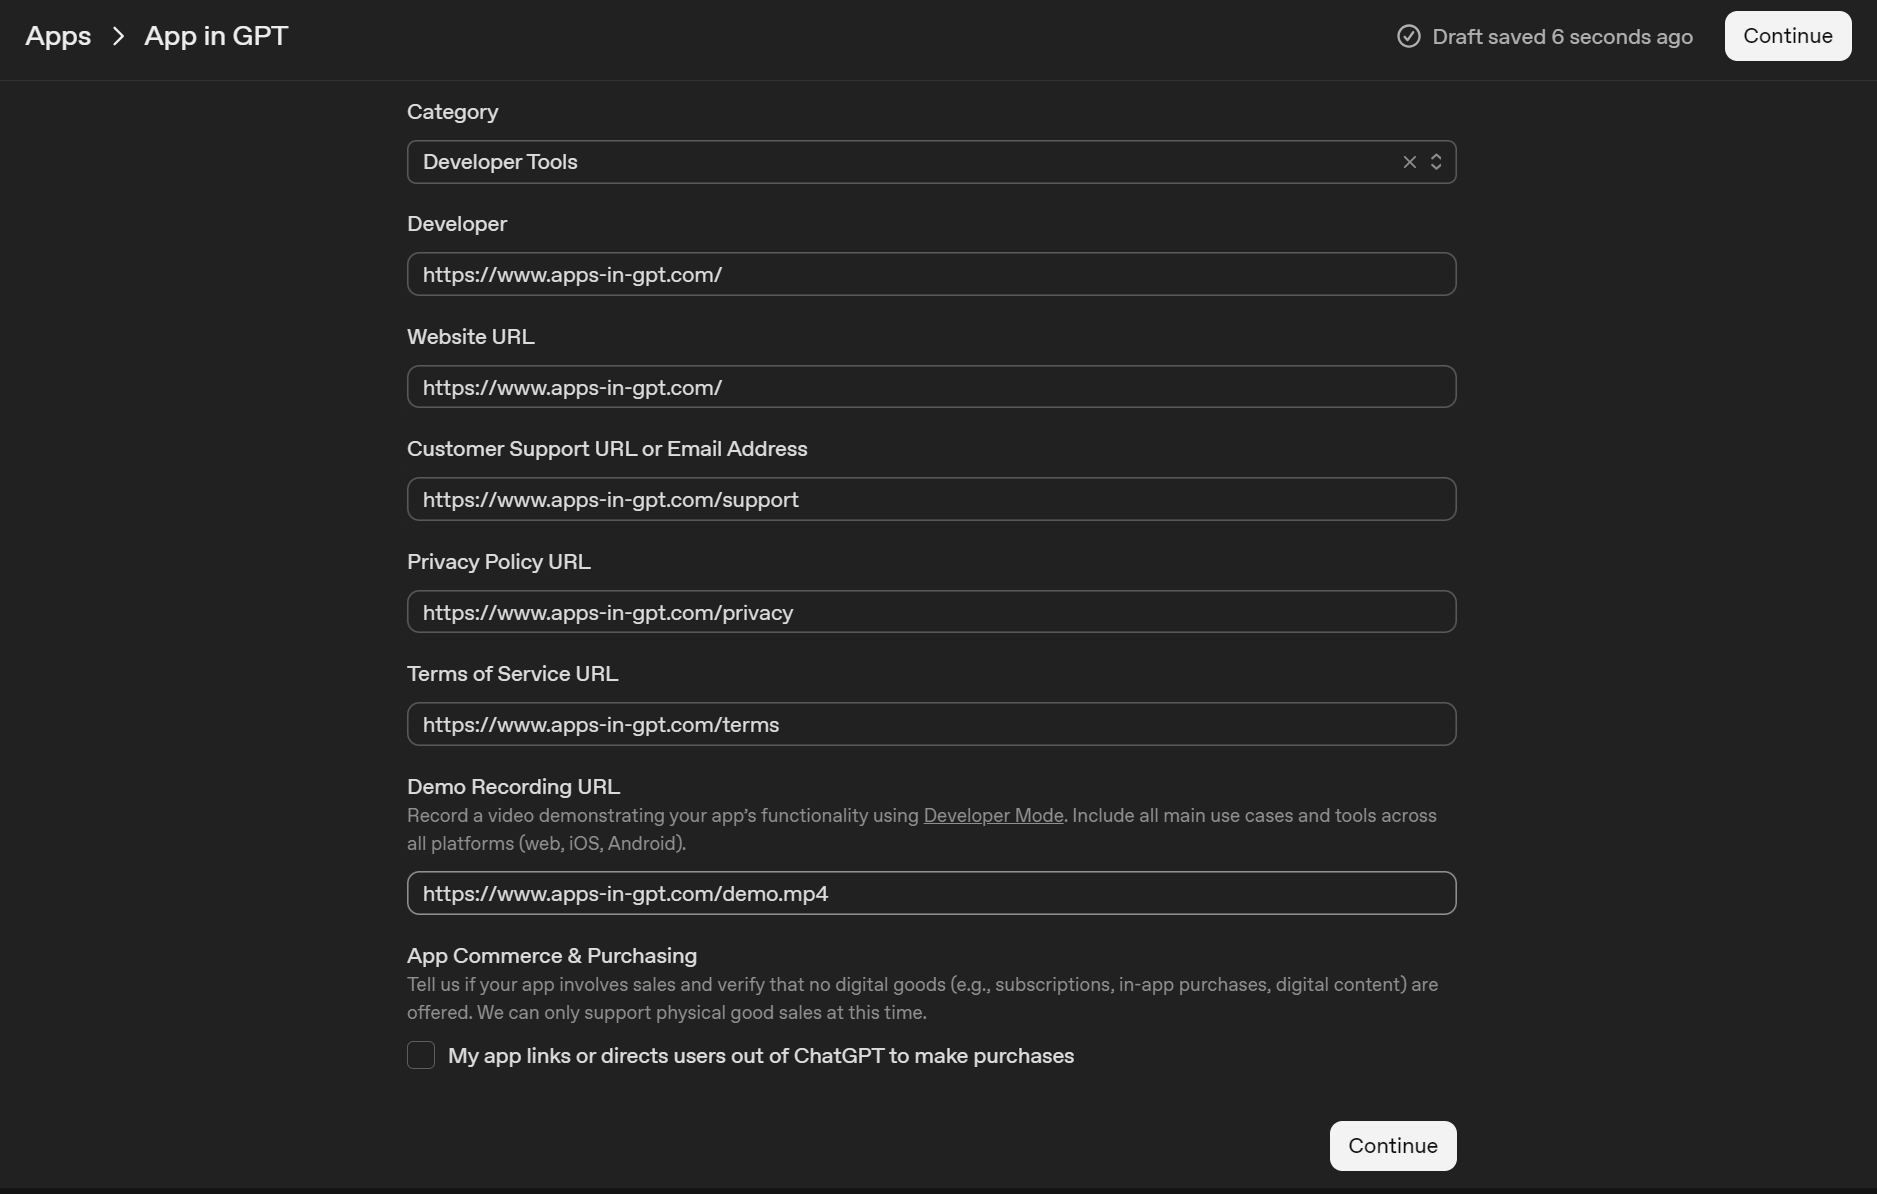
Developer name
Fill in the Developer field. Use either your company name or your personal developer name, depending on how you plan to submit.
Links you need to prepare
You will need the following URLs (or email for support):
- Website URL: your main site
- Customer Support URL or Email Address: a support page or a support email
- Privacy Policy URL
- Terms of Service URL
- Demo Recording URL: a direct link to an MP4 video that demonstrates your app
For the demo video, record the core flow end to end and show the main use cases. The UI also mentions using Developer Mode and demonstrating behavior across platforms when relevant.
App Commerce and Purchasing checkbox
At the bottom there is a checkbox:
“My app links or directs users out of ChatGPT to make purchases.”
Enable it only if your app sends users to an external checkout or purchase flow. If you do not sell anything, or purchasing is not part of the experience, leave it unchecked.
Step 2: MCP Server
Here you paste your MCP Server URL (for example https://your-domain.com/mcp) and choose whether the app requires authorization.
Auth
In the dropdown you will typically see:
- No Auth: use this if your MCP server is public and does not require user login or tokens.
- OAuth: use this if users must sign in and you need per-user access.
- Mixed Auth: use this if some tools are public but some require auth.

Domain verification
After you enter the MCP URL you will see Domain not verified and a block with:
- Verification token (a long string)
- Place this token at (an exact URL path)
- Verify Domain button
How to verify:
- Copy the Verification token.
- Create a file on your server at the exact path shown in “Place this token at”. In practice it is usually under
/.well-known/…on the same domain you entered. - Put the token as the only content of that file (no JSON, no HTML, no extra spaces).
- Deploy or restart your server so the file is publicly reachable.
- Open the “Place this token at” URL in a browser to confirm it returns the token.
Go back to the form and click Verify Domain.
Tool justification
After the domain is verified and you click Scan Tools, the dashboard discovers tools from your MCP server. Then you see Tool justification.
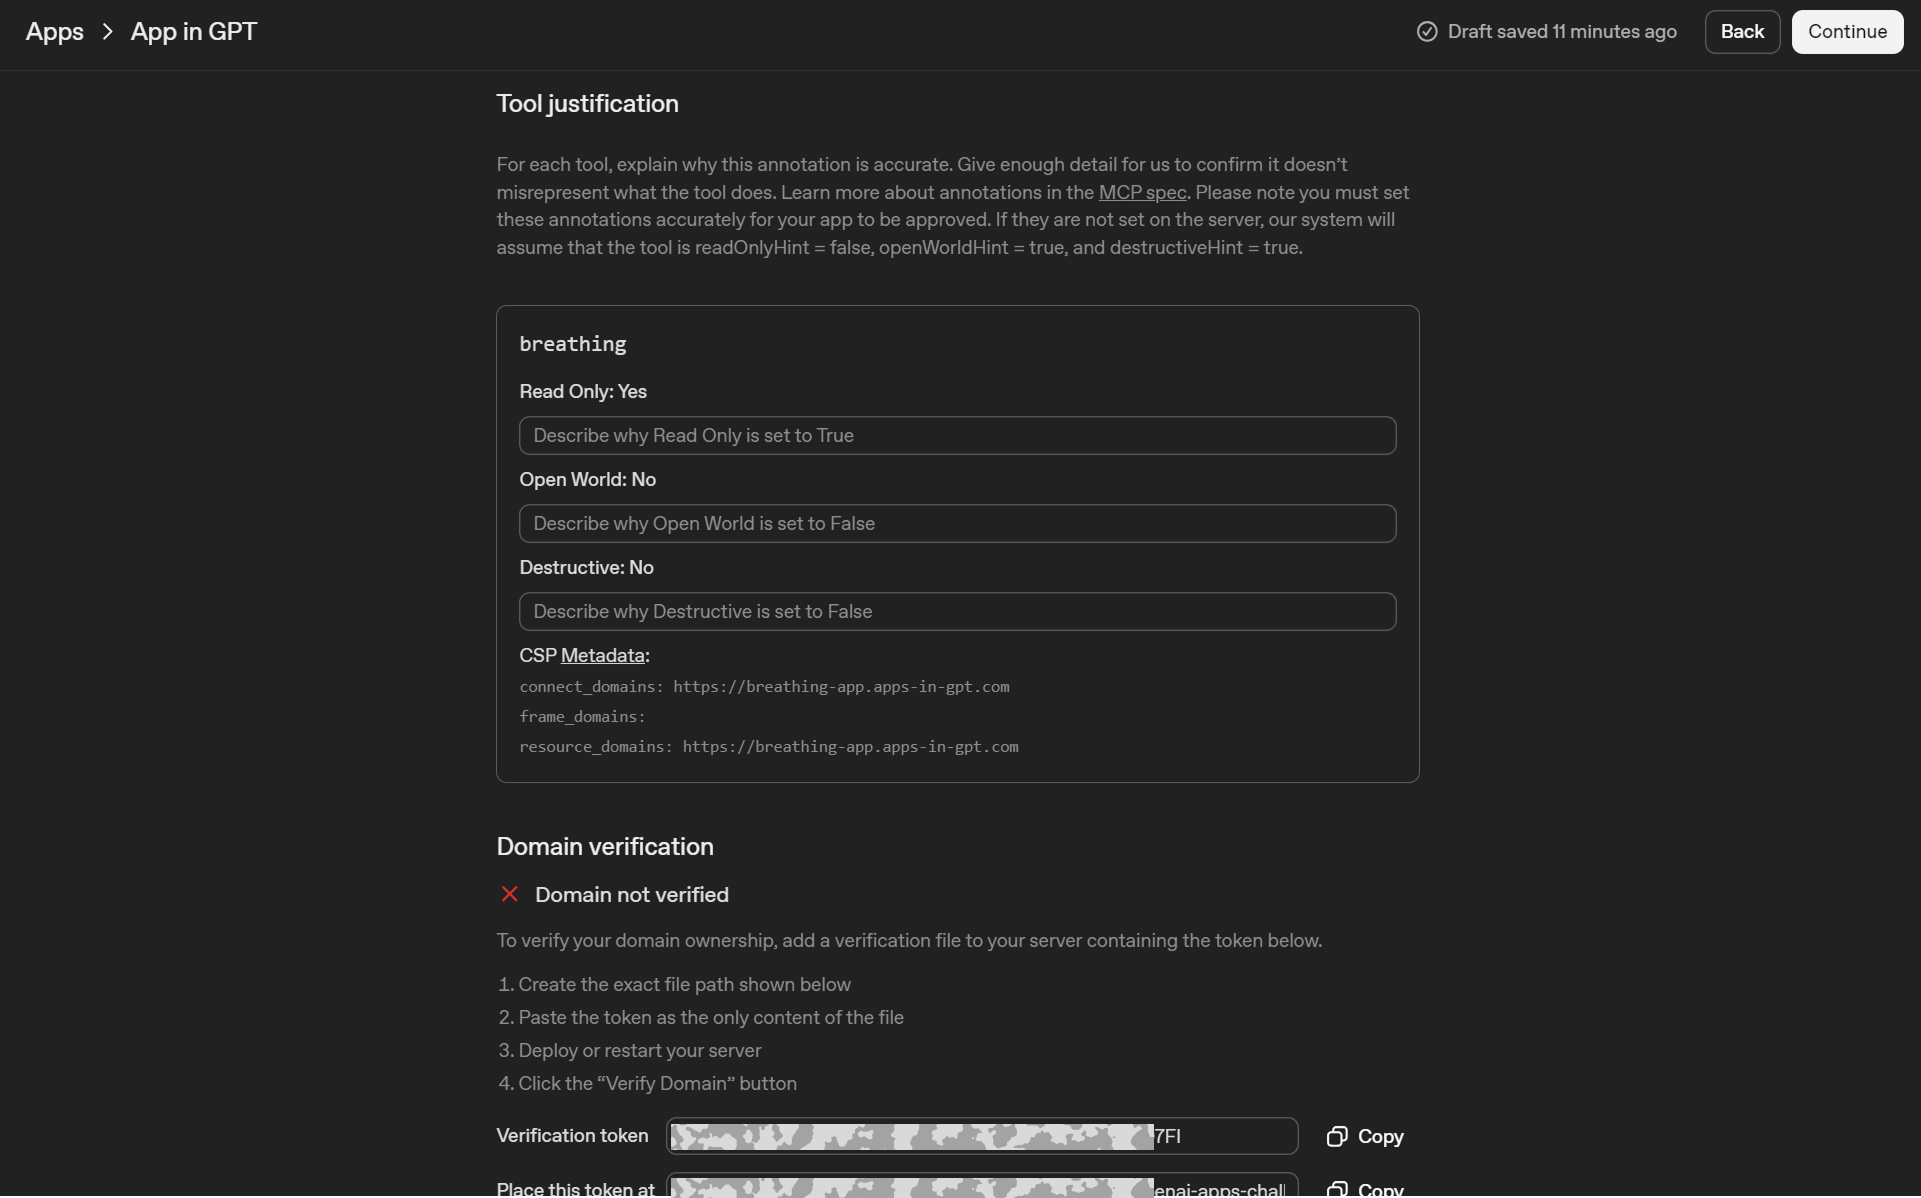
This section is about tool safety and permissions. For each tool you must confirm the annotations and explain why they are accurate:
- Read Only: does the tool only read data, or can it change something
- Open World: can the tool access external websites, the public internet, or arbitrary domains
- Destructive: can the tool delete, overwrite, or perform irreversible actions
You will also see CSP Metadata (connect_domains, frame_domains, resource_domains). This is basically an allowlist of domains your app is allowed to connect to and load resources from. Keep it minimal and include only what your app actually uses.
What to write in the three text fields:
- Keep it literal and specific, 1 to 2 sentences each.
- Describe exactly what the tool does and what it cannot do.
Example for a simple demo tool like breathing:
- Read Only justification: “This tool only returns guided breathing instructions. It does not store, write, or modify any user data.”
- Open World justification: “The tool does not browse the internet and does not call third-party APIs. It only uses our own MCP endpoint.”
- Destructive justification: “The tool cannot delete or overwrite data. It produces a response only.”
If your tools do call external services, say which services and why, and make sure the CSP allowlist matches that.
Step 3: Testing
On this step you provide test prompts that reviewers can run to validate your MCP server.
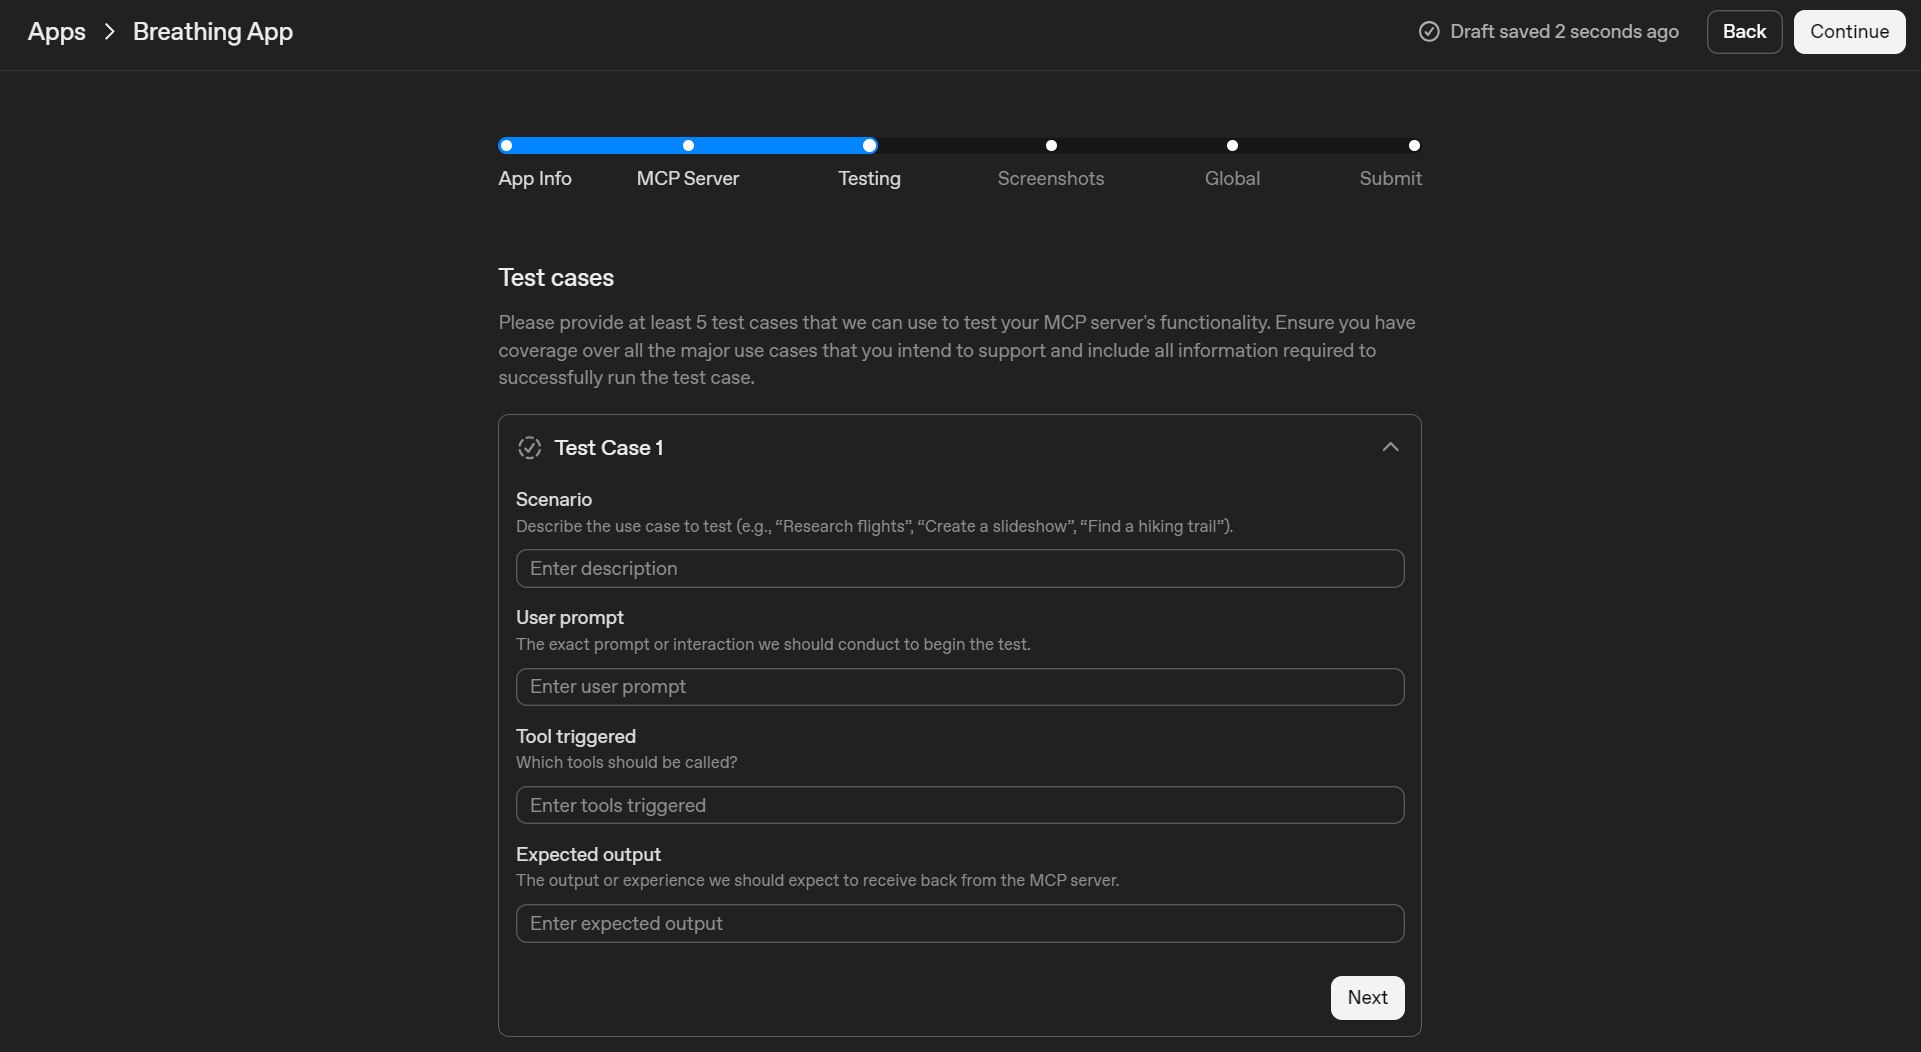
Test cases
You need at least 5 test cases. Each one should cover a core user scenario and include everything required to execute it successfully.
What to include in each test case:
- A clear user prompt that should trigger your app
- Any required inputs or constraints
- The expected outcome in plain language (what the tool should do or return)
Tips:
- Cover your main tools and the most important flows.
- Make the prompts specific. Avoid vague prompts like “help me” or “use the tool”.
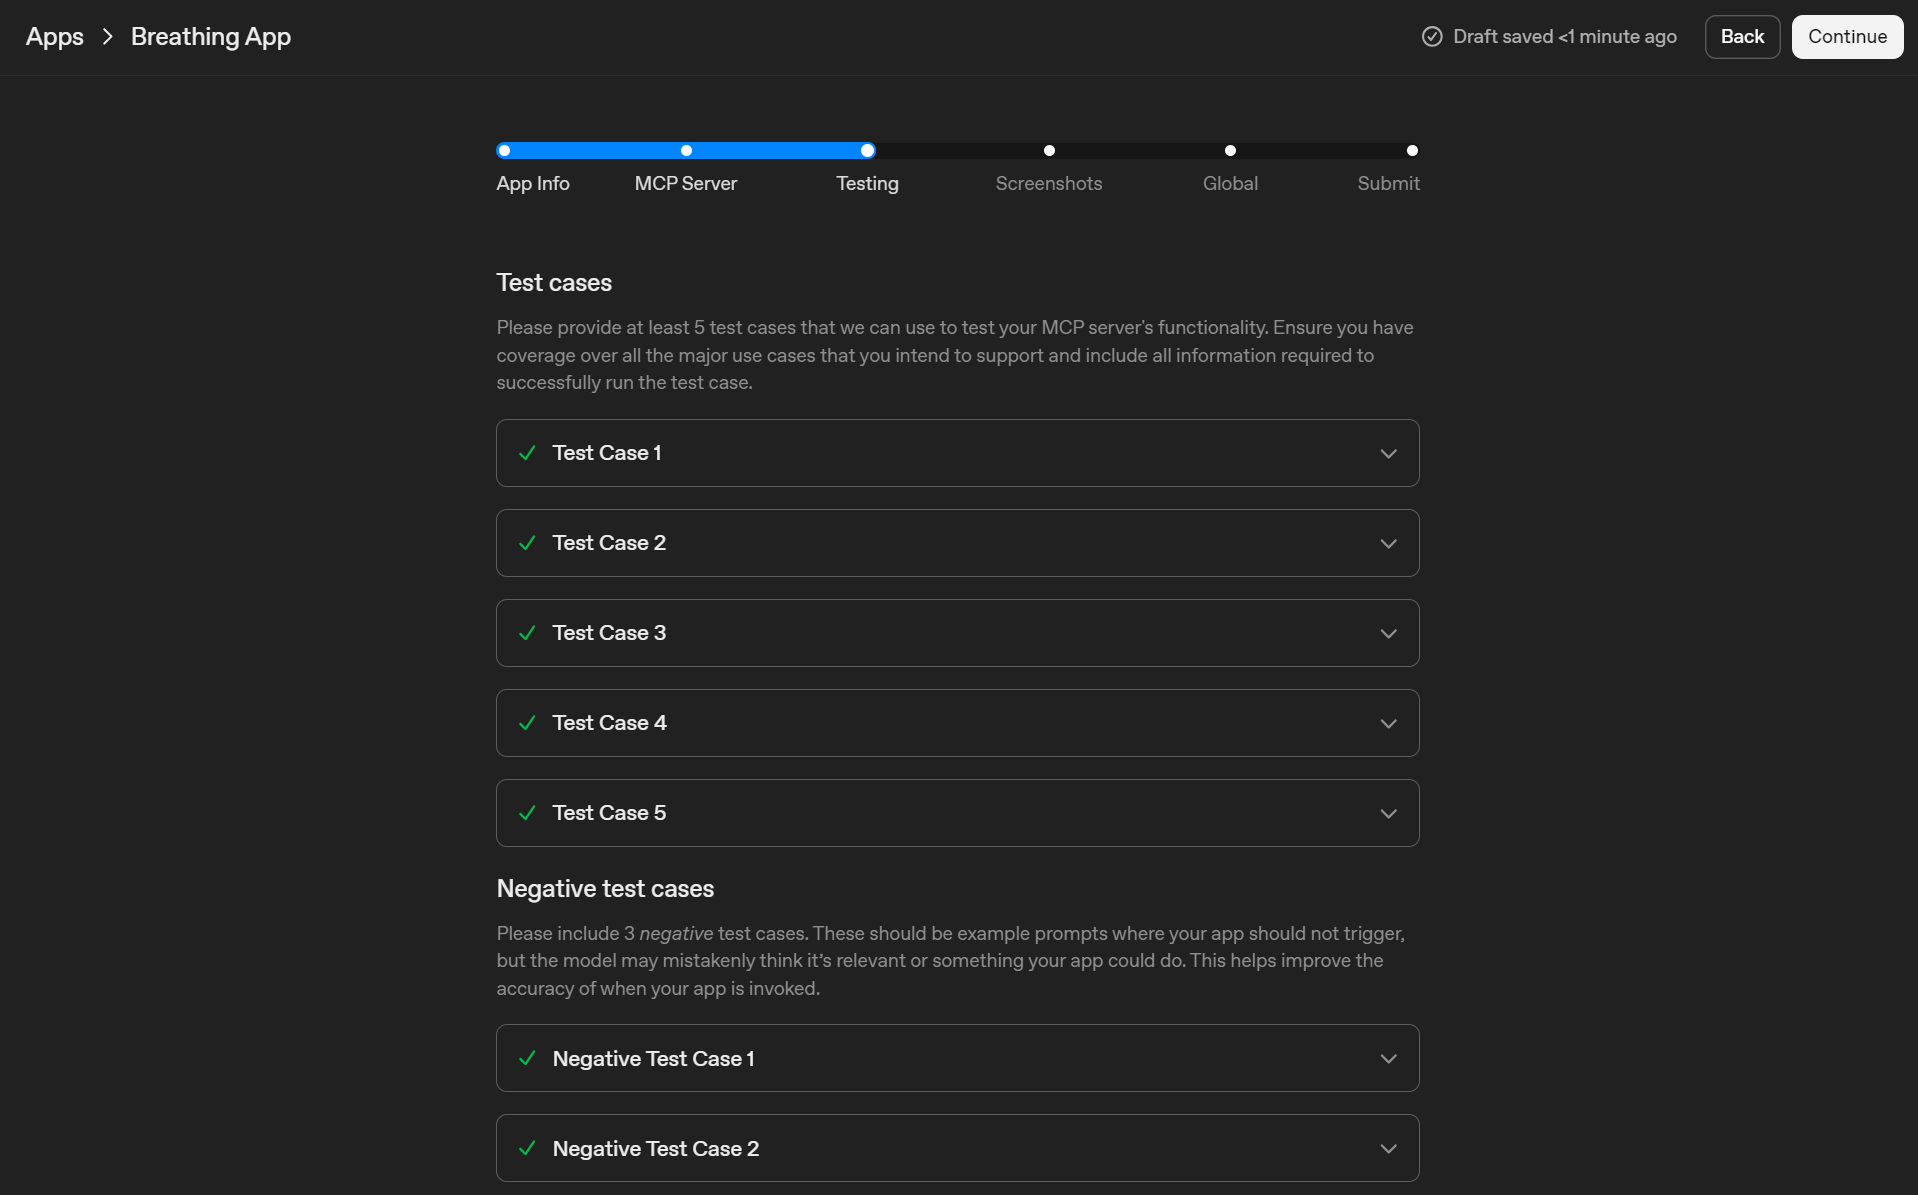
Negative test cases
You also need 3 negative test cases. These are prompts where your app should not be invoked, even if the topic sounds loosely related.
What to include:
- A user prompt that might confuse the model
- A short note on why the app should not trigger
Examples for a breathing style app:
- “Write a marketing plan for a fitness startup” (should not trigger)
- “Summarize this legal contract” (should not trigger)
- “Book a flight to Berlin” (should not trigger)
Goal of this step: help OpenAI test both correctness and trigger precision, so your app is invoked when it should be and stays out of the way when it should not.
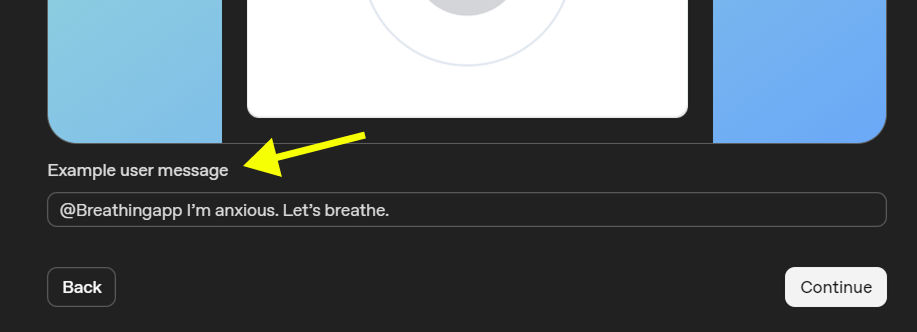
Step 4: Screenshots
On this step you upload screenshots that will appear on your app’s directory page. Each screenshot also has a small field for an example user message that would trigger that screen.
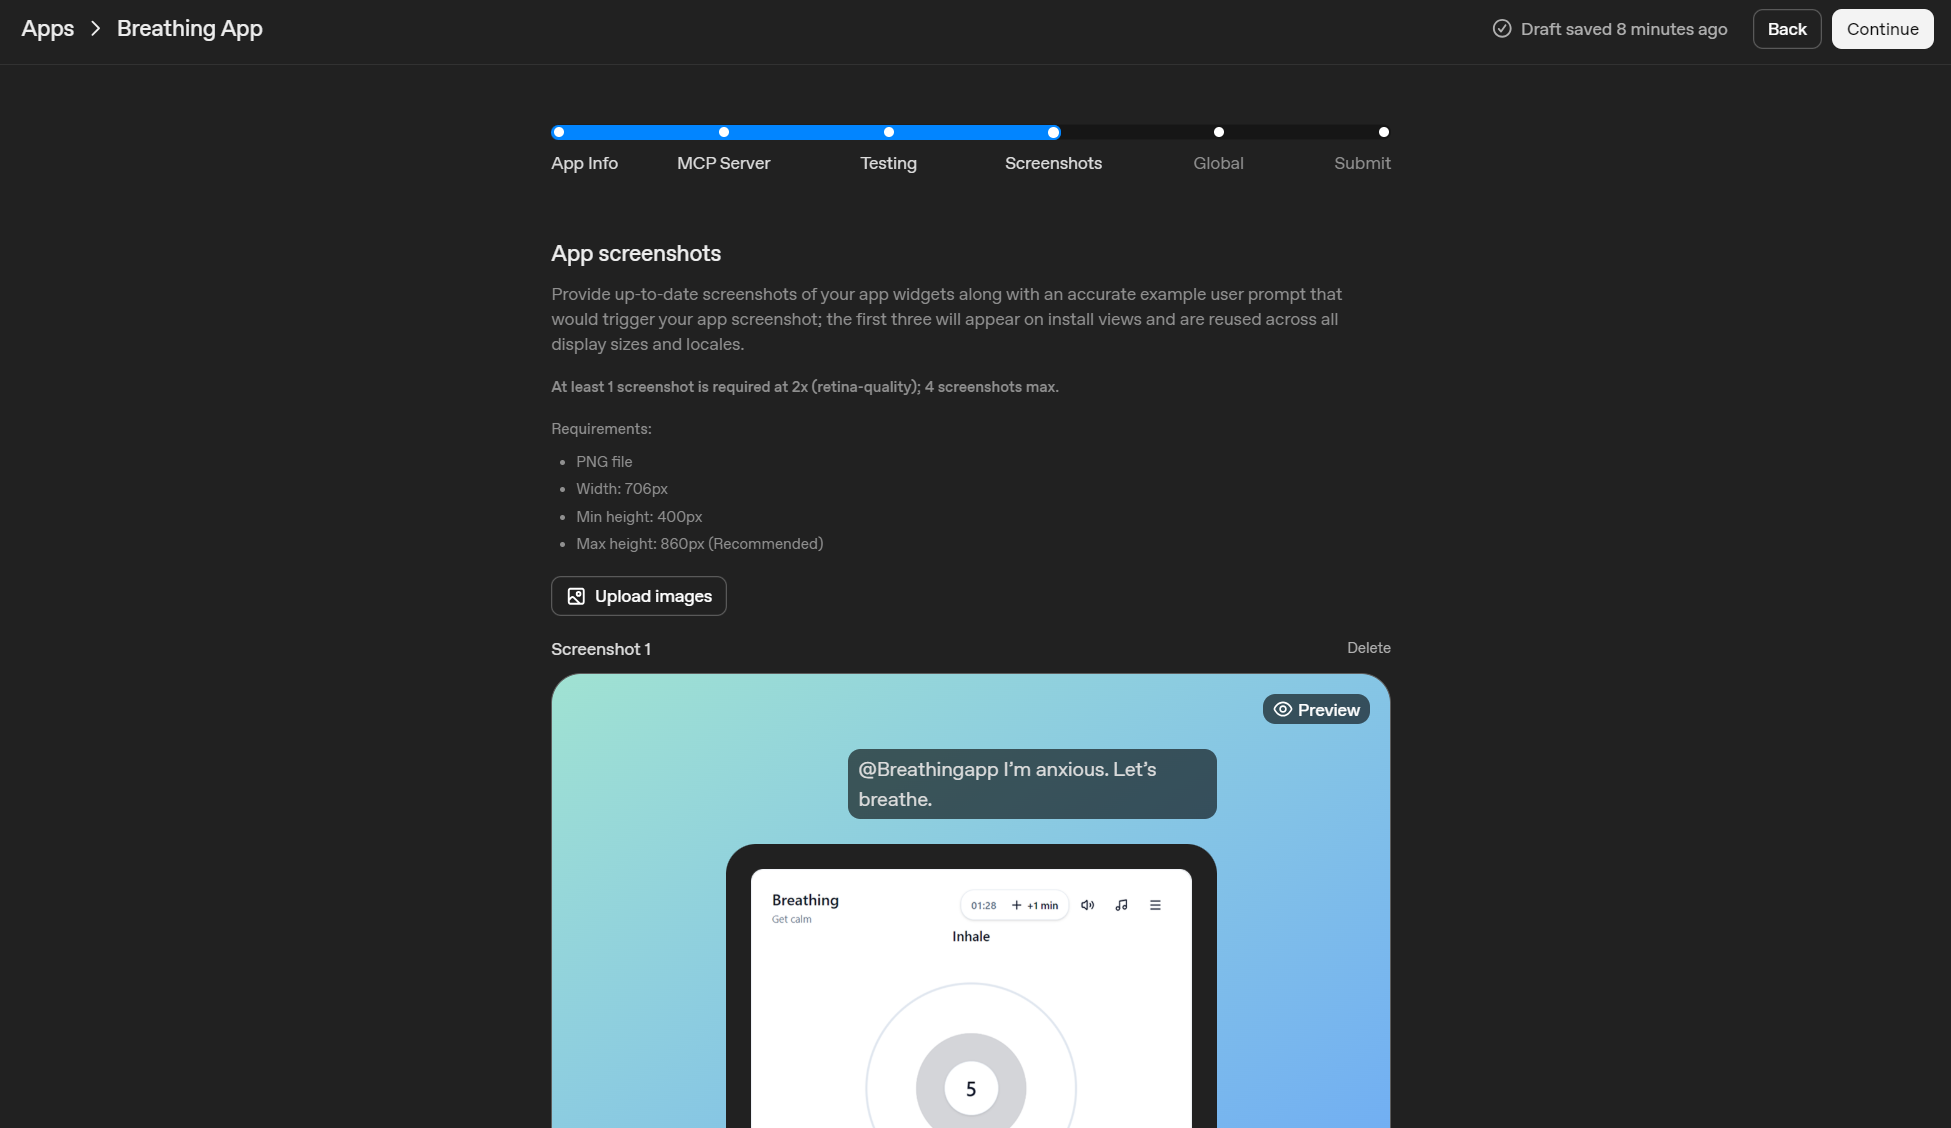
Notice: the example user message is not part of the screenshot. You do not need to design or mock up an image that includes the user’s chat message. Upload only the screenshot of your app UI itself, meaning the content inside the app widget frame.
Practical tips:
- Capture the widget in a realistic state that matches a main use case.
- Keep the UI readable and avoid tiny text.
- Follow the size requirements shown in the form and upload PNG files.
Step 5: Global
This step is about how your app will be presented and distributed across markets and languages.
Typical tasks here:
- Choose where the app is available. Global or limited regions.
- Set language and localization expectations. If you only support English, state it clearly.
- Confirm any content or usage constraints that affect safety and compliance.
- Double check that your public listing information is consistent with how the app actually behaves.
Tip: keep this section conservative. If something is not supported yet, do not imply it is. Reviewers will compare these settings with your MCP behavior and your demo video.
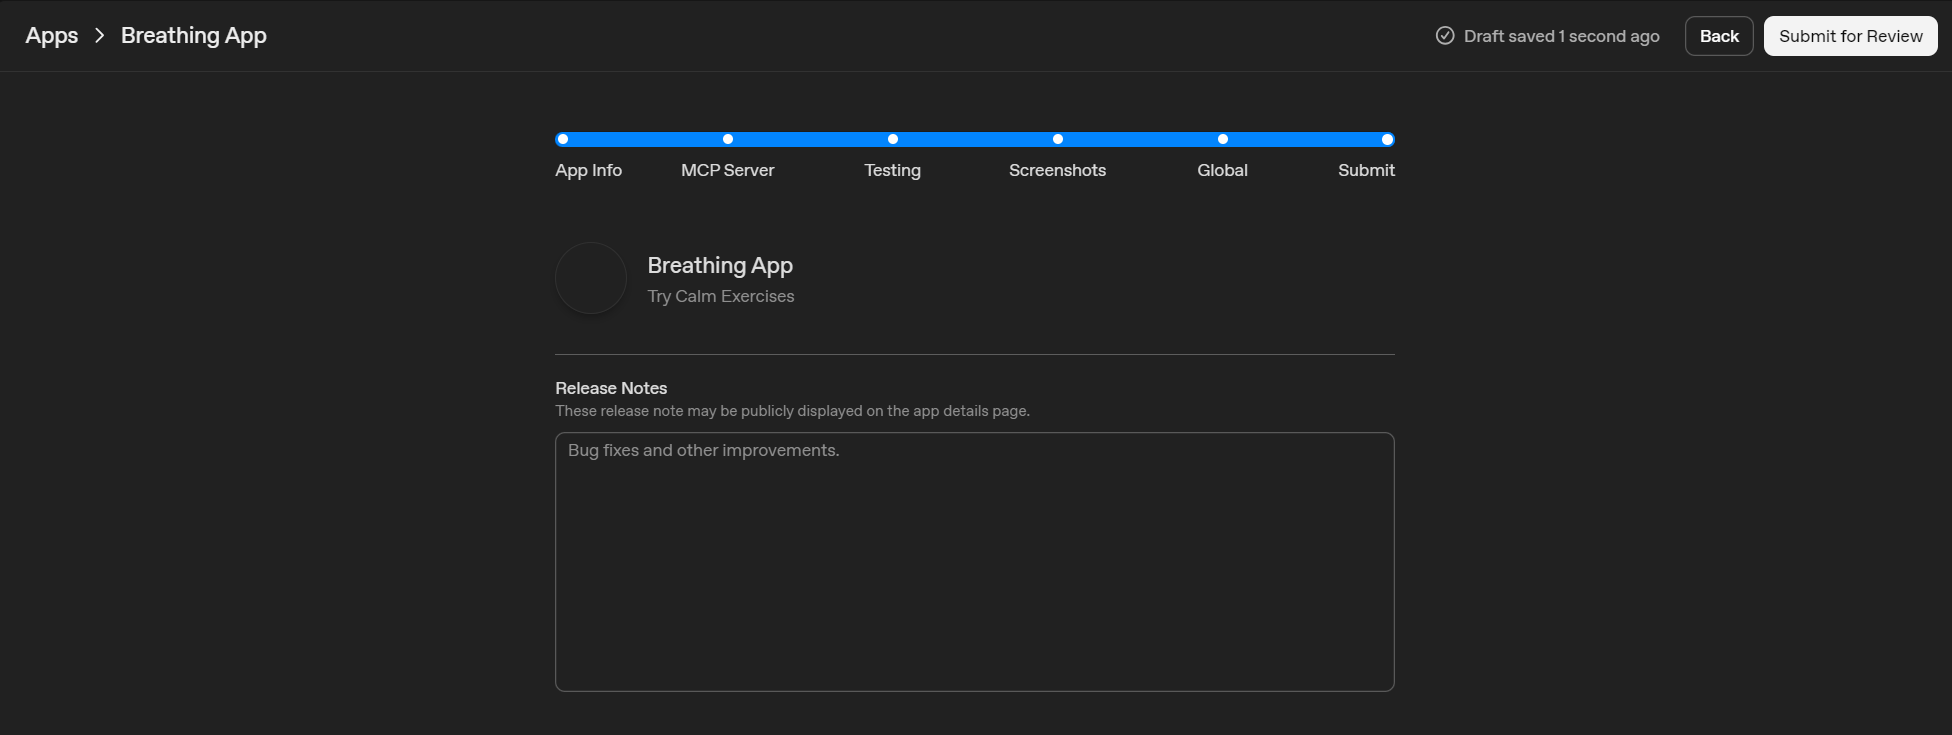
Step 6: Submit
This is the final screen before your app goes into Review.
Release notes
Add short release notes for the first version. Keep it factual and focused on what is actually included. These notes may be shown publicly, so avoid hype and avoid promises you cannot guarantee.
Good pattern:
- “Initial release.”
- 2 to 4 bullets with the main capabilities.
- One bullet on the main limitation, if relevant.
Policy compliance checklist
Next you must confirm a set of compliance statements, including:
- You reviewed OpenAI’s Terms and App Submission Guidelines.
- Your app complies with applicable laws and regulations.
- Whether your app performs money or crypto transfers or investment trades.
- Whether your app shows ads.
- That you have rights to any third party content and APIs your app uses.
Only check what is true for your app. If something is not true, fix the app or remove the feature before submitting.
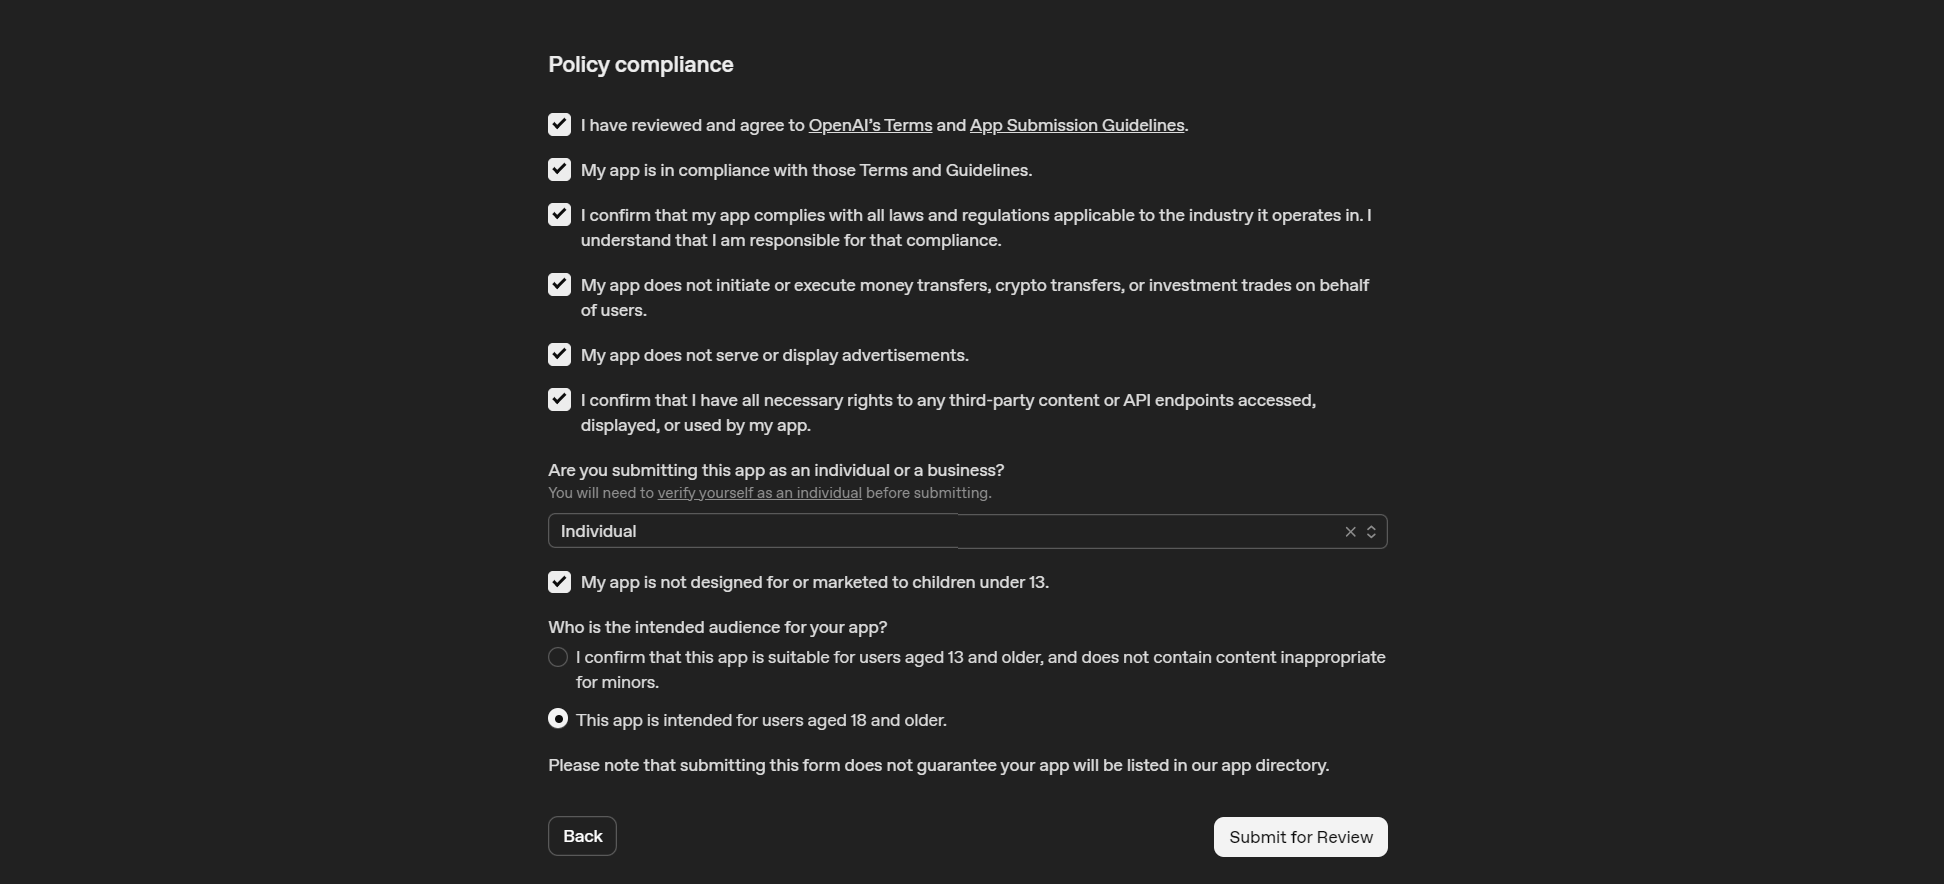
Individual or business
You also select whether you are submitting as Individual or Business. If your account is not verified yet, the UI will prompt you to verify first.
Age and audience
Finally, you confirm:
- The app is not designed for or marketed to children under 13.
- The intended audience, typically either 13+ or 18+.
Choose conservatively. If your app may surface sensitive content or is not intended for minors, select the higher age audience option.
Submit for Review
Click Submit for Review. After that, the app switches to the Review status in your apps list. Submission does not guarantee listing in the directory.
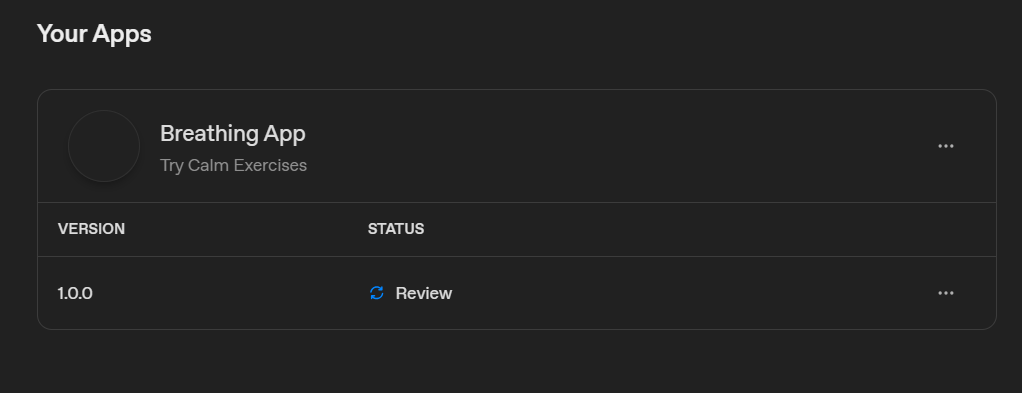
Congrats, your app is now under review!
We wish you a smooth approval process and a strong reception from the ChatGPT Apps audience.